If you’re craving something fresh, fruity, and creamy without turning on the oven, this No-Bake Kiwi Cheesecake Recipe is exactly what you need. It’s perfect for warm afternoons or when you want an impressive dessert that feels light but totally satisfying. I love how the vibrant green kiwis add a tangy pop that’s as beautiful as it is delicious.

Jump to:
Why You’ll Love This
This no-bake delight is all about marrying creamy sweetness with bright, fresh kiwi flavor, making it an easy crowd-pleaser anytime you want something a bit special but fuss-free.
- Reliable Texture, Great Flavor: You’ll get that perfectly smooth, silky filling without any baking worries, balanced by the fruity zing of kiwi.
- Crisp–Golden Finish: The buttery graham cracker crust adds a toasty crunch that contrasts beautifully with the soft cheesecake.
- Pantry-Friendly Ingredients: Most of what you need is probably already in your kitchen—no fancy items required.
- Weeknight Easy, Weekend Worthy: It’s quick to prep on a busy day but fancy enough for guests or celebrations.
Ingredient Snapshot

Choosing ripe, fresh kiwis is a game-changer here. Their natural sweetness and tang bring the cheesecake alive, while a good-quality cream cheese ensures a silky, rich texture.
- Graham cracker crumbs: Use finely crushed crumbs for that even, sturdy base.
- Unsalted butter: Melted butter binds the crust beautifully without overpowering the flavor.
- Cream cheese: Softened to room temperature for ease of mixing and a velvety finish.
- Heavy whipping cream: Whipped to soft peaks to lighten the filling and give it loft.
- Kiwi fruit: Look for slightly soft, fragrant kiwis for max flavor and easy pureeing.
- Powdered sugar: Helps keep the filling smooth and blends easily.
Quick Note: Exact measurements are in the printable recipe card at the bottom.
How to Make No-Bake Kiwi Cheesecake Recipe
Step 1 — Set Up & Season
Start by combining the graham cracker crumbs, melted butter, and granulated sugar in a bowl. You want a mix that feels like damp sand—press it firmly into the bottom of your 9-inch springform pan for a compact crust. Then pop it into the fridge to chill while you prep the filling. Chilling the crust’s essential so it firms up nicely and holds together when you slice later. Don’t skip the pressing step—this crust needs to be tight and level for the best results.
Step 2 — Sear, Toast, or Mix
Now, beat the softened cream cheese until it’s smooth and creamy. I usually do this with a hand mixer for about 2–3 minutes to get rid of lumps. Then add your powdered sugar and vanilla extract, blending until combined. Next, whip the heavy cream until you get soft peaks—when the cream just holds a shape without being stiff. Fold the whipped cream gently into the cream cheese mixture to keep it light and fluffy. Finally, carefully fold in your fresh sliced kiwi pieces so they don’t mush but still distribute some juicy fruitiness throughout.
Step 3 — Finish for Best Texture
Pour this luscious filling over the chilled crust and smooth the top with a spatula. Refrigerate the cheesecake for at least four hours to let it set fully—the longer, the better if you can wait. While it chills, whisk together your kiwi puree by blending peeled kiwis with a little sugar until smooth, then spread it gently over the set cheesecake just before serving. This layer adds a fresh, glossy finish and a touch more tang. Keep the cheesecake covered in the fridge, especially if you’re prepping ahead.
Smart Little Tips
From my own kitchen adventures, I’ve learned the best way to keep this cheesecake flawlessly creamy and bright is patience. Let it chill long enough—that’s the secret.
- Doneness Cue: The cheesecake should be firm to the touch but not rock hard—the texture should gently spring back.
- Temperature Trick: Always use cream cheese and butter softened to room temperature; cold ingredients can cause lumps.
- Make-Ahead Move: You can assemble a day ahead, just hold off on adding the kiwi puree topping until serving for the freshest look.
- Avoid This Pitfall: Don’t rush the chilling process, or the filling might be too soft to slice cleanly.
Serving Ideas

Finishing Touches
For the perfect finish, I like to add a few extra kiwi slices on top just before serving. The bright green slices contrast beautifully with the creamy filling and add that fresh, zesty burst with every bite.
Pair It With
This cheesecake pairs wonderfully with a cup of green tea or a light sparkling wine to balance the richness. For texture contrast, a crisp biscotti or almond cookie on the side complements the softness of the filling.
Easy Plating Upgrades
Try serving slices on a white plate to highlight the kiwi’s vibrant hue. A sprinkle of finely chopped toasted pistachios around the edges adds crunch and a stunning pop of color, perfect for weekend guests.
Make-Ahead, Store & Reheat
Storing Leftovers
Keep leftovers tightly covered in an airtight container or wrapped well with plastic wrap in the fridge. It stays fresh and creamy for about 3–4 days, though I’ve never had it last that long because it’s too good to resist.
Freezing Tips
This cheesecake freezes okay, but the texture of fresh kiwi might change a bit. If freezing, wrap it tightly in plastic and foil to prevent cracks, then thaw overnight in the fridge. Expect a slightly softer texture, still tasty enough to enjoy.
Reheating No-Bake Kiwi Cheesecake Recipe Without Drying Out
Since this cheesecake is best served cold, reheating isn’t usually needed. But if you want to soften it slightly, let it sit at room temperature for 15–20 minutes. Avoid microwaving or oven heating to keep its creamy texture intact and prevent drying out.
Frequently Asked Questions
You don’t need gelatin for this No-Bake Kiwi Cheesecake Recipe. The cream cheese and whipped cream firm up nicely when chilled, providing a sturdy texture without extra additives.
I like to slice off both ends, then slide a spoon between the skin and flesh to scoop it out easily. It keeps the kiwi slices intact and pretty for folding into the filling.
Absolutely! This recipe works well with other mellow fruits like mango or peach, but kiwi gives a special tangy brightness that’s hard to replace perfectly.
The hands-on prep is just about 20 minutes, but remember to chill the cheesecake for at least 4 hours so it sets perfectly.
Final Thoughts
This No-Bake Kiwi Cheesecake Recipe is one of those treats I keep going back to when I want a fresh, no-fuss dessert that feels lush but cleanses the palate. It’s versatile, dependable, and turns those bright kiwis into something that tastes like sunshine on a plate. I hope you enjoy making it as much as I do—it’s a lovely way to celebrate simple ingredients with a splash of brightness and charm.
PrintPrint Recipe
No-Bake Kiwi Cheesecake Recipe
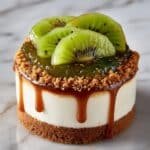
A refreshing no-bake kiwi cheesecake featuring a graham cracker crust, creamy filling with fresh sliced kiwis, and a sweet kiwi puree topping. This easy-to-make dessert is perfect for summer and requires no oven baking.
- Prep Time: 20 minutes
- Cook Time: 4 hours
- Total Time: 4 hours 20 minutes
- Yield: 8 servings
- Category: Dessert
- Method: No-Cook
- Cuisine: American
- Diet: Vegetarian
Ingredients
Crust
- 1 ½ cups graham cracker crumbs
- ½ cup unsalted butter, melted
- ¼ cup granulated sugar
Filling
- 16 oz cream cheese, softened
- 1 cup powdered sugar
- 1 teaspoon vanilla extract
- 1 cup heavy whipping cream
- 3 ripe kiwis, peeled and sliced
Topping
- 1 cup kiwi puree (about 4 kiwis)
- 2 tablespoons granulated sugar for puree
- Additional kiwi slices for garnish
Instructions
- Prepare the Crust: In a bowl, combine graham cracker crumbs, melted unsalted butter, and granulated sugar. Press the mixture firmly into the bottom of a 9-inch springform pan. Chill in the refrigerator to set while preparing the filling.
- Make the Filling: Beat the softened cream cheese in a large bowl until smooth and creamy. Add powdered sugar and vanilla extract, mixing well. In a separate bowl, whip the heavy cream until stiff peaks form, then gently fold it into the cream cheese mixture until fully combined.
- Add Kiwi: Gently fold the sliced kiwis into the cream filling, ensuring even distribution without breaking the slices.
- Assemble the Cheesecake: Pour the filling mixture over the chilled crust in the springform pan. Smooth the top and refrigerate for at least 4 hours to allow the cheesecake to set properly.
- Prepare the Topping: Blend approximately 4 kiwis with 2 tablespoons of granulated sugar until smooth to create the kiwi puree. Once the cheesecake has set, gently spread the kiwi puree evenly over the surface.
- Garnish and Serve: Decorate the top of the cheesecake with additional kiwi slices for a fresh look. Slice and serve chilled for best taste.
Notes
- Make sure the cream cheese is at room temperature for smoother filling.
- Chilling the crust before adding the filling helps it hold together better.
- For a sweeter topping, adjust the sugar in the kiwi puree to taste.
- You can substitute graham cracker crumbs with digestive biscuits if preferred.
- This cheesecake is best served within 24 hours for freshness.


Leave a Reply